跨平台原生模块 (C++)
用 C++ 编写模块是共享平台无关代码的最佳方式,可用于 Android 和 iOS。通过纯 C++ 模块,您可以只编写一次逻辑,并立即在所有平台重用它,无需编写特定平台的代码。
在本指南中,我们将介绍创建纯 C++ Turbo 原生模块的过程
- 创建 JS 规范
- 配置 Codegen 以生成脚手架
- 实现原生逻辑
- 在 Android 和 iOS 应用程序中注册模块
- 在 JS 中测试您的更改
本指南的其余部分假定您已通过运行以下命令创建了您的应用程序
npx @react-native-community/cli@latest init SampleApp --version 0.83
1. 创建 JS 规范
纯 C++ Turbo 原生模块是 Turbo 原生模块。它们需要一个规范文件(也称为 spec 文件),以便 Codegen 可以为我们生成脚手架代码。规范文件也是我们在 JS 中访问 Turbo 原生模块所使用的。
Spec 文件需要用类型化的 JS 方言编写。React Native 目前支持 Flow 或 TypeScript。
- 在应用程序的根文件夹中,创建一个名为
specs的新文件夹。 - 创建一个名为
NativeSampleModule.ts的新文件,其中包含以下代码
所有原生 Turbo 模块的 spec 文件都必须带有 Native 前缀,否则 Codegen 将忽略它们。
- TypeScript
- Flow
// @flow
import type {TurboModule} from 'react-native'
import { TurboModuleRegistry } from "react-native";

export interface Spec extends TurboModule {
  +reverseString: (input: string) => string;
}

export default (TurboModuleRegistry.getEnforcing<Spec>(
  "NativeSampleModule"
): Spec);
import {TurboModule, TurboModuleRegistry} from 'react-native';

export interface Spec extends TurboModule {
  readonly reverseString: (input: string) => string;
}

export default TurboModuleRegistry.getEnforcing<Spec>(
  'NativeSampleModule',
);
2. 配置 Codegen
下一步是在您的 package.json 中配置 Codegen。更新文件以包含
     "start": "react-native start",
     "test": "jest"
   },
   "codegenConfig": {
     "name": "AppSpecs",
     "type": "modules",
     "jsSrcsDir": "specs",
     "android": {
       "javaPackageName": "com.sampleapp.specs"
     }
   },
   "dependencies": {
此配置告诉 Codegen 在 specs 文件夹中查找 spec 文件。它还指示 Codegen 只为 modules 生成代码,并将生成的代码命名空间设置为 AppSpecs。
3. 编写原生代码
编写 C++ Turbo 原生模块允许您在 Android 和 iOS 之间共享代码。因此,我们将只编写一次代码,并查看我们需要对平台应用哪些更改,以便 C++ 代码能够被拾取。
-
在与
android和ios文件夹同级的目录中创建一个名为shared的文件夹。 -
在
shared文件夹内,创建一个名为NativeSampleModule.h的新文件。shared/NativeSampleModule.h#pragma once
#include <AppSpecsJSI.h>
#include <memory>
#include <string>
namespace facebook::react {
class NativeSampleModule : public NativeSampleModuleCxxSpec<NativeSampleModule> {
public:
NativeSampleModule(std::shared_ptr<CallInvoker> jsInvoker);
std::string reverseString(jsi::Runtime& rt, std::string input);
};
} // namespace facebook::react -
在
shared文件夹内,创建一个名为NativeSampleModule.cpp的新文件。shared/NativeSampleModule.cpp#include "NativeSampleModule.h"
namespace facebook::react {
NativeSampleModule::NativeSampleModule(std::shared_ptr<CallInvoker> jsInvoker)
: NativeSampleModuleCxxSpec(std::move(jsInvoker)) {}
std::string NativeSampleModule::reverseString(jsi::Runtime& rt, std::string input) {
return std::string(input.rbegin(), input.rend());
}
} // namespace facebook::react
让我们看一下我们创建的两个文件
NativeSampleModule.h文件是纯 C++ TurboModule 的头文件。include语句确保我们包含 Codegen 将创建的 spec,这些 spec 包含我们需要实现的接口和基类。- 模块位于
facebook::react命名空间中,以便访问该命名空间中存在的所有类型。 NativeSampleModule类是实际的 Turbo 原生模块类,它扩展了NativeSampleModuleCxxSpec类,该类包含一些粘合代码和样板代码,以使此类能够作为 Turbo 原生模块运行。- 最后,我们有构造函数,它接受指向
CallInvoker的指针,以便在需要时与 JS 通信,以及我们必须实现的函数原型。
NativeSampleModule.cpp 文件是我们 Turbo 原生模块的实际实现,并实现了我们在 spec 中声明的构造函数和方法。
4. 在平台中注册模块
接下来的步骤将使我们能够在平台中注册模块。这是将原生代码公开给 JS 的步骤,以便 React Native 应用程序最终可以从 JS 层调用原生方法。
这是我们唯一需要编写特定平台代码的时候。
Android
为了确保 Android 应用能够有效地构建 C++ Turbo 原生模块,我们需要
- 创建一个
CMakeLists.txt来访问我们的 C++ 代码。 - 修改
build.gradle以指向新创建的CMakeLists.txt文件。 - 在我们的 Android 应用中创建一个
OnLoad.cpp文件来注册新的 Turbo 原生模块。
1. 创建 CMakeLists.txt 文件
Android 使用 CMake 进行构建。CMake 需要访问我们在共享文件夹中定义的文件才能构建它们。
- 创建一个名为
SampleApp/android/app/src/main/jni的新文件夹。jni文件夹是 Android 的 C++ 部分所在的位置。 - 创建一个
CMakeLists.txt文件并添加此内容
cmake_minimum_required(VERSION 3.13)

# Define the library name here.
project(appmodules)

# This file includes all the necessary to let you build your React Native application
include(${REACT_ANDROID_DIR}/cmake-utils/ReactNative-application.cmake)

# Define where the additional source code lives. We need to crawl back the jni, main, src, app, android folders
target_sources(${CMAKE_PROJECT_NAME} PRIVATE ../../../../../shared/NativeSampleModule.cpp)

# Define where CMake can find the additional header files. We need to crawl back the jni, main, src, app, android folders
target_include_directories(${CMAKE_PROJECT_NAME} PUBLIC ../../../../../shared)
CMake 文件执行以下操作
- 定义
appmodules库,所有应用的 C++ 代码都将包含在此处。 - 加载 React Native 的基本 CMake 文件。
- 使用
target_sources指令添加我们需要构建的模块 C++ 源代码。默认情况下,React Native 会用默认源填充appmodules库,我们在此处包含我们自定义的源。您可以看到我们需要从jni文件夹回溯到包含 C++ Turbo 模块的shared文件夹。 - 指定 CMake 在何处查找模块头文件。在这种情况下,我们也需要从
jni文件夹回溯。
2. 修改 build.gradle 以包含自定义 C++ 代码
Gradle 是编排 Android 构建的工具。我们需要告诉它在哪里可以找到 CMake 文件来构建 Turbo 原生模块。
- 打开
SampleApp/android/app/build.gradle文件。 - 将以下块添加到 Gradle 文件中,位于现有的
android块内
    buildTypes {
        debug {
            signingConfig signingConfigs.debug
        }
        release {
            // Caution! In production, you need to generate your own keystore file.
            // see https://reactnative.net.cn/docs/signed-apk-android.
            signingConfig signingConfigs.debug
            minifyEnabled enableProguardInReleaseBuilds
            proguardFiles getDefaultProguardFile("proguard-android.txt"), "proguard-rules.pro"
        }
    }

+   externalNativeBuild {
+       cmake {
+           path "src/main/jni/CMakeLists.txt"
+       }
+   }
}
此块告诉 Gradle 文件在哪里查找 CMake 文件。路径相对于 build.gradle 文件所在文件夹,因此我们需要将路径添加到 jni 文件夹中的 CMakeLists.txt 文件。
3. 注册新的 Turbo 原生模块
最后一步是在运行时注册新的 C++ Turbo 原生模块,以便当 JS 请求 C++ Turbo 原生模块时,应用程序知道在哪里找到它并可以返回它。
- 从
SampleApp/android/app/src/main/jni文件夹运行以下命令
curl -O https://raw.githubusercontent.com/facebook/react-native/v0.83.0/packages/react-native/ReactAndroid/cmake-utils/default-app-setup/OnLoad.cpp
- 然后,像这样修改文件
#include <DefaultComponentsRegistry.h>
#include <DefaultTurboModuleManagerDelegate.h>
#include <autolinking.h>
#include <fbjni/fbjni.h>
#include <react/renderer/componentregistry/ComponentDescriptorProviderRegistry.h>
#include <rncore.h>

+ // Include the NativeSampleModule header
+ #include <NativeSampleModule.h>

//...

std::shared_ptr<TurboModule> cxxModuleProvider(
    const std::string& name,
    const std::shared_ptr<CallInvoker>& jsInvoker) {
  // Here you can provide your CXX Turbo Modules coming from
  // either your application or from external libraries. The approach to follow
  // is similar to the following (for a module called `NativeCxxModuleExample`):
  //
  // if (name == NativeCxxModuleExample::kModuleName) {
  //   return std::make_shared<NativeCxxModuleExample>(jsInvoker);
  // }

+  // This code registers the module so that when the JS side asks for it, the app can return it
+  if (name == NativeSampleModule::kModuleName) {
+    return std::make_shared<NativeSampleModule>(jsInvoker);
+  }

  // And we fallback to the CXX module providers autolinked
  return autolinking_cxxModuleProvider(name, jsInvoker);
}

// leave the rest of the file
这些步骤从 React Native 下载原始的 OnLoad.cpp 文件,以便我们可以安全地覆盖它以加载应用程序中的 C++ Turbo 原生模块。
下载文件后,我们可以通过以下方式修改它
- 包含指向我们模块的头文件
- 注册 Turbo 原生模块,以便当 JS 请求它时,应用程序可以返回它。
现在,您可以从项目根目录运行 yarn android 来查看您的应用程序成功构建。
iOS
为了确保 iOS 应用能够有效地构建 C++ Turbo 原生模块,我们需要
- 安装 Pods 并运行 Codegen。
- 将
shared文件夹添加到我们的 iOS 项目。 - 在应用程序中注册 C++ Turbo 原生模块。
1. 安装 Pods 并运行 Codegen。
我们需要运行的第一步是我们每次准备 iOS 应用程序时都要运行的常规步骤。CocoaPods 是我们用于设置和安装 React Native 依赖项的工具,作为该过程的一部分,它还会为我们运行 Codegen。
cd ios
bundle install
bundle exec pod install
2. 将共享文件夹添加到 iOS 项目
此步骤将 shared 文件夹添加到项目中,使其在 Xcode 中可见。
- 打开 CocoaPods 生成的 Xcode 工作区。
cd ios
open SampleApp.xcworkspace
- 单击左侧的
SampleApp项目,然后选择Add files to "Sample App"...。
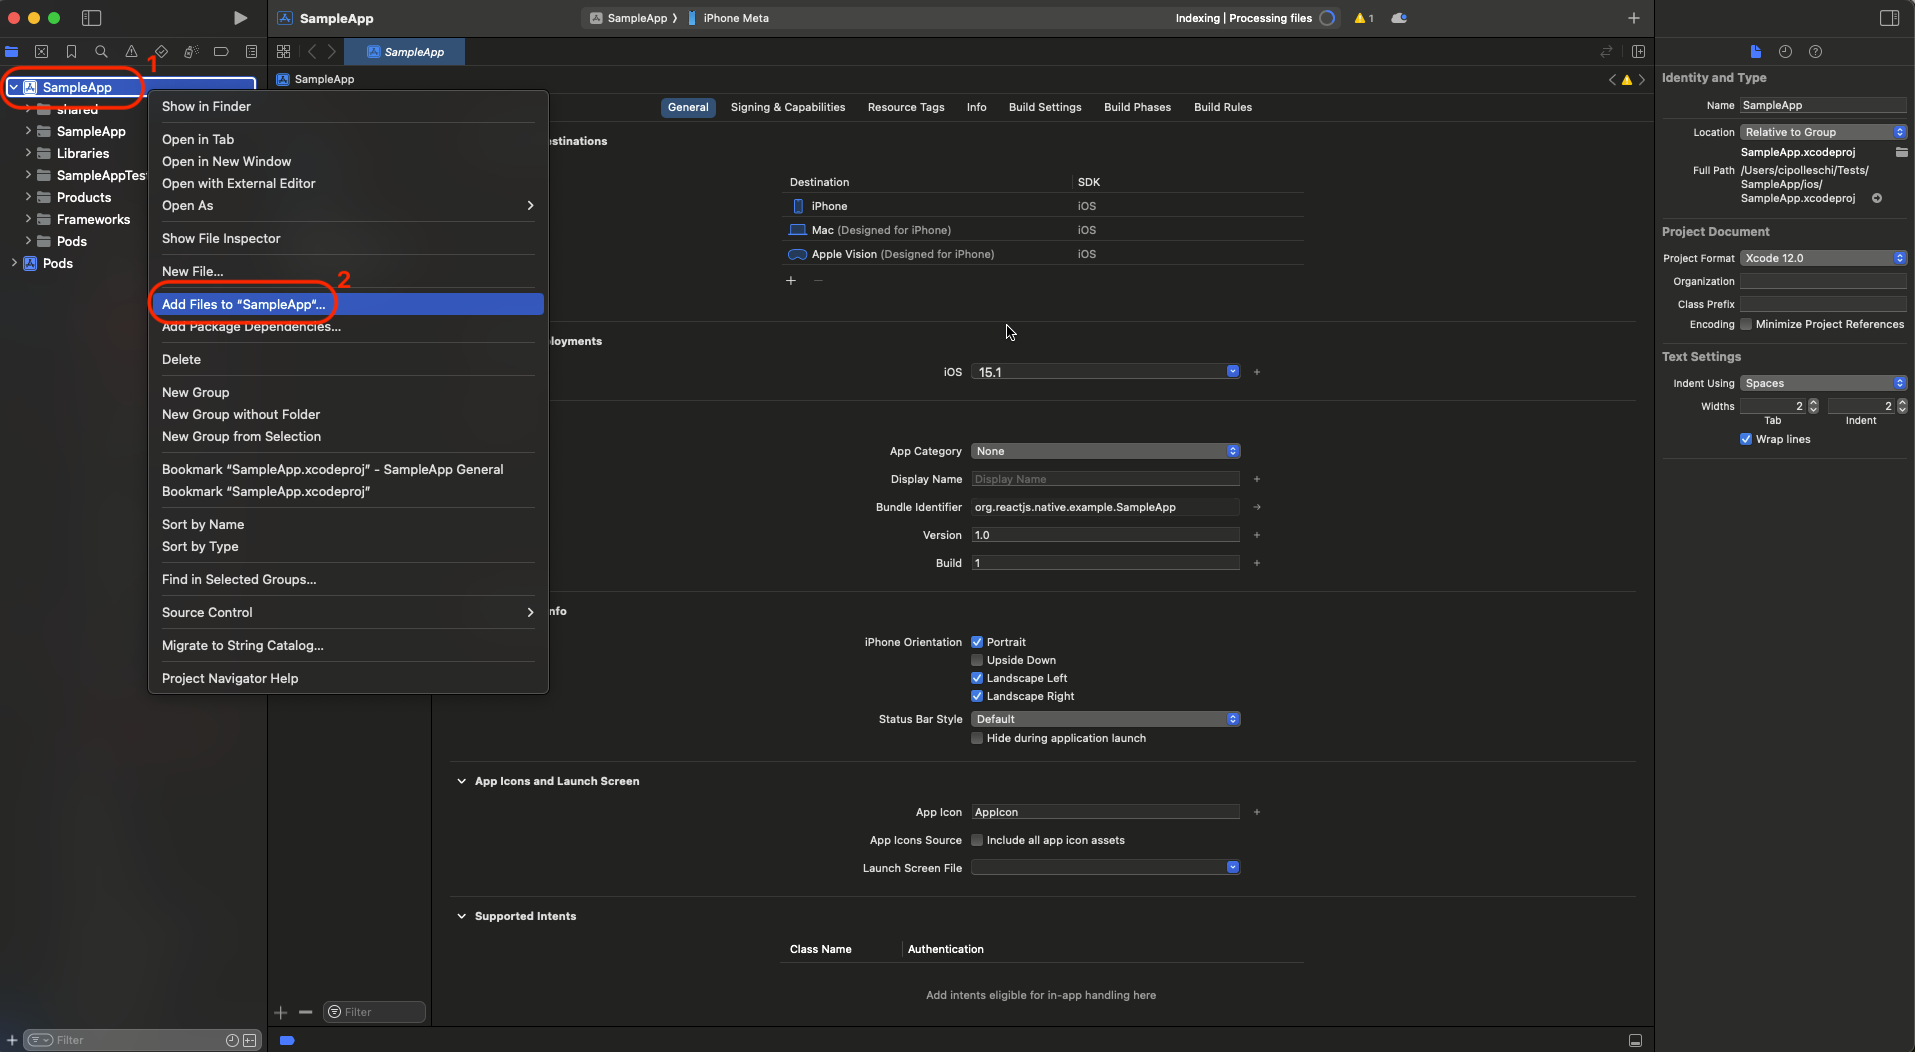
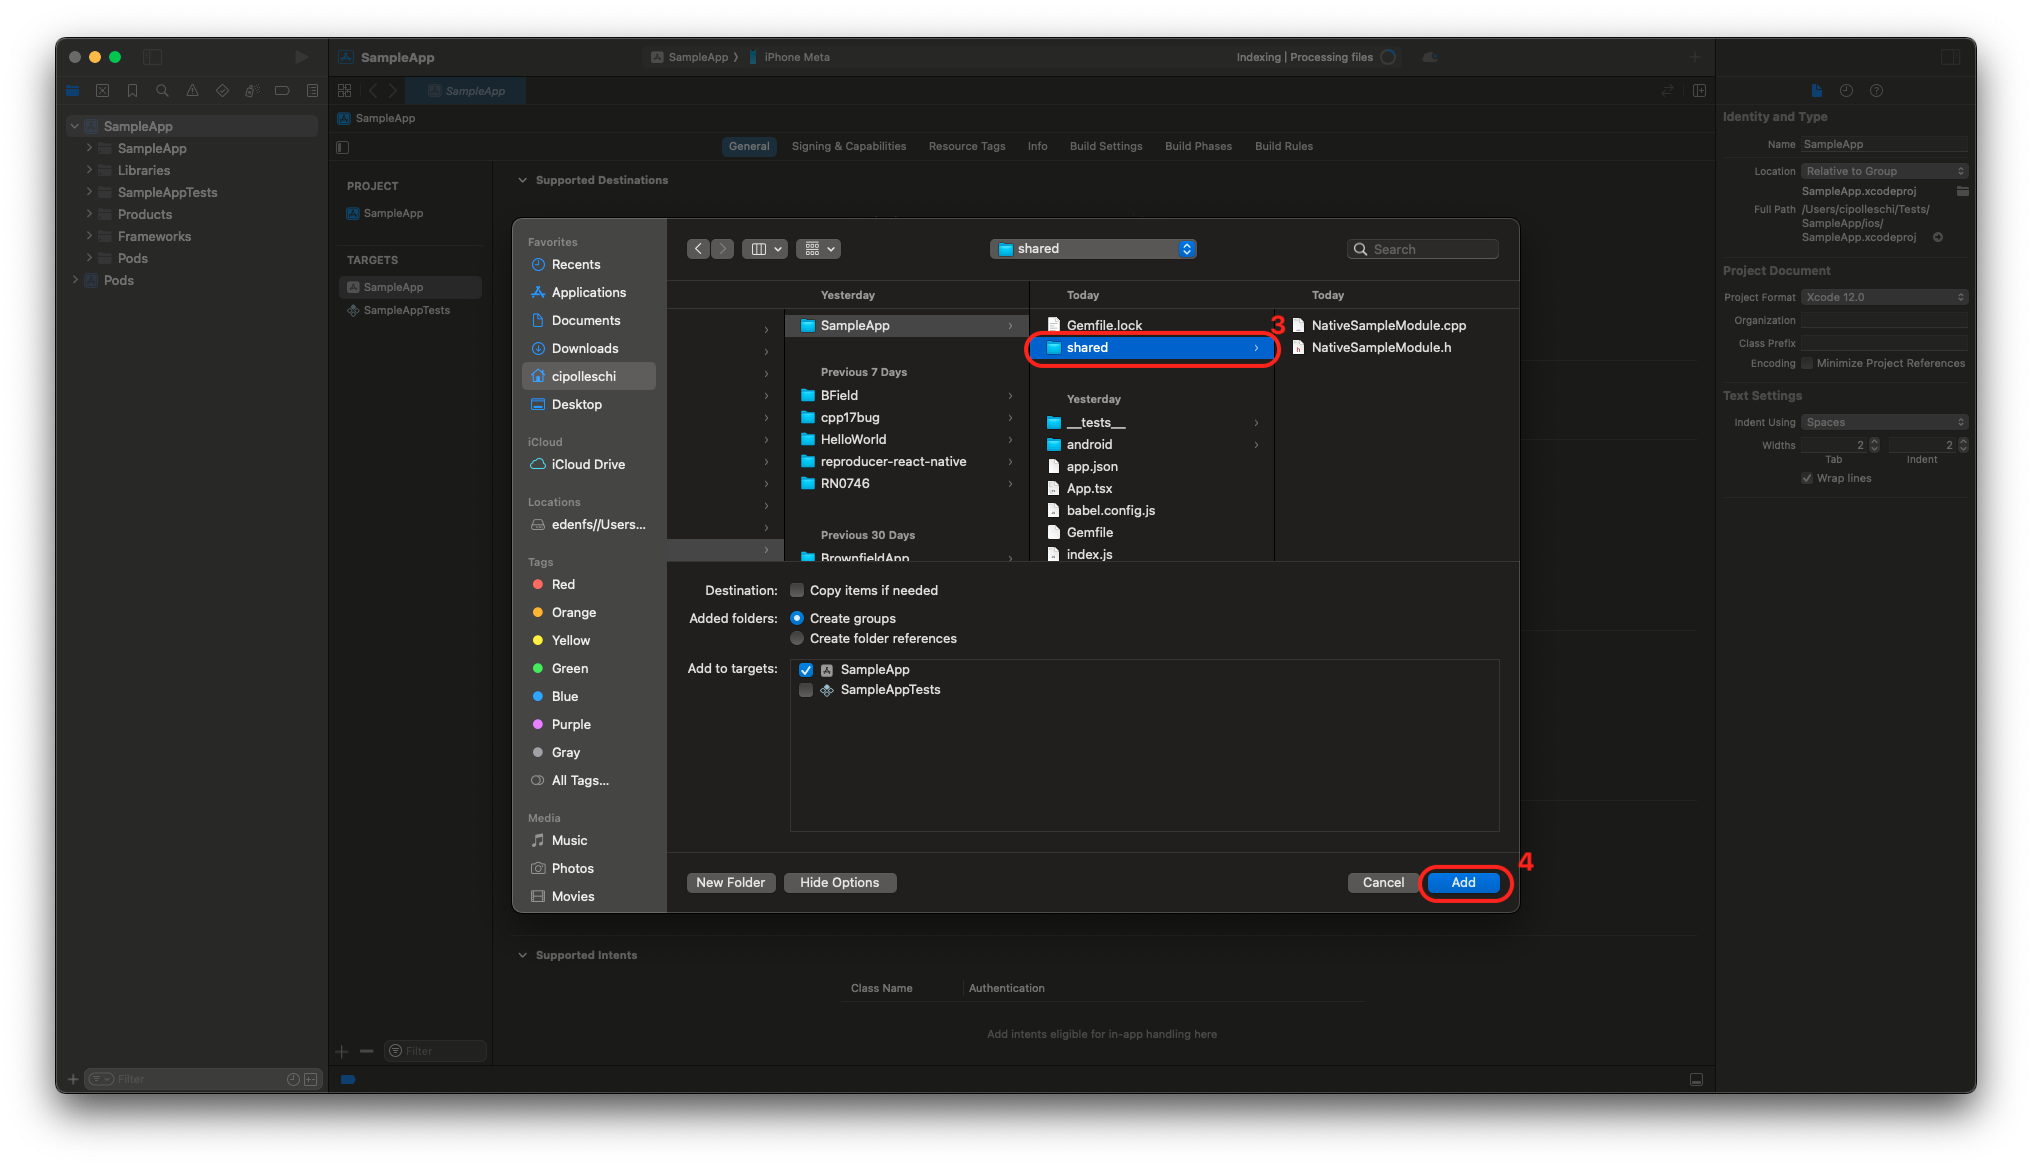
- 选择
shared文件夹,然后单击Add。
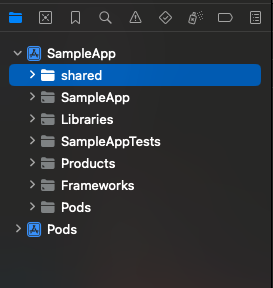
如果您一切顺利,您左侧的项目应如下所示
3. 在您的应用中注册 Cxx Turbo 原生模块
要注册纯 Cxx Turbo 原生模块,您需要
- 为原生模块创建一个
ModuleProvider - 配置
package.json以将 JS 模块名称与 ModuleProvider 类关联。
ModuleProvider 是一个 Objective-C++,它将纯 C++ 模块与您的其余 iOS 应用连接起来。
3.1 创建 ModuleProvider
- 在 Xcode 中,选择
SampleApp项目,然后按 ⌘ + N 创建一个新文件。 - 选择
Cocoa Touch Class模板 - 添加名称
SampleNativeModuleProvider(其他字段保持为Subclass of: NSObject和Language: Objective-C) - 单击 Next 生成文件。
- 将
SampleNativeModuleProvider.m重命名为SampleNativeModuleProvider.mm。mm扩展名表示 Objective-C++ 文件。 - 用以下内容实现
SampleNativeModuleProvider.h的内容
#import <Foundation/Foundation.h>
#import <ReactCommon/RCTTurboModule.h>

NS_ASSUME_NONNULL_BEGIN

@interface NativeSampleModuleProvider : NSObject <RCTModuleProvider>

@end

NS_ASSUME_NONNULL_END
这声明了一个符合 RCTModuleProvider 协议的 NativeSampleModuleProvider 对象。
- 用以下内容实现
SampleNativeModuleProvider.mm的内容
#import "NativeSampleModuleProvider.h"
#import <ReactCommon/CallInvoker.h>
#import <ReactCommon/TurboModule.h>
#import "NativeSampleModule.h"

@implementation NativeSampleModuleProvider

- (std::shared_ptr<facebook::react::TurboModule>)getTurboModule:
    (const facebook::react::ObjCTurboModule::InitParams &)params
{
  return std::make_shared<facebook::react::NativeSampleModule>(params.jsInvoker);
}

@end
此代码通过在调用 getTurboModule: 方法时创建纯 C++ NativeSampleModule 来实现 RCTModuleProvider 协议。
3.2 更新 package.json
最后一步是更新 package.json,以便让 React Native 了解原生模块的 JS 规范与原生代码中这些规范的具体实现之间的关联。
像这样修改 package.json
     "start": "react-native start",
     "test": "jest"
   },
   "codegenConfig": {
     "name": "AppSpecs",
     "type": "modules",
     "jsSrcsDir": "specs",
     "android": {
       "javaPackageName": "com.sampleapp.specs"
     },
     "ios": {
        "modulesProvider": {
          "NativeSampleModule":  "NativeSampleModuleProvider"
        }
     }
   },

   "dependencies": {
此时,您需要重新安装 pod 以确保 codegen 再次运行以生成新文件
# from the ios folder
bundle exec pod install
open SampleApp.xcworkspace
现在,如果您从 Xcode 构建应用程序,您应该能够成功构建。
5. 测试您的代码
现在是时候从 JS 访问我们的 C++ Turbo 原生模块了。为此,我们必须修改 App.tsx 文件以导入 Turbo 原生模块并在我们的代码中调用它。
- 打开
App.tsx文件。 - 用以下代码替换模板的内容
import React from 'react';
import {
  Button,
  SafeAreaView,
  StyleSheet,
  Text,
  TextInput,
  View,
} from 'react-native';
import SampleTurboModule from './specs/NativeSampleModule';

function App(): React.JSX.Element {
  const [value, setValue] = React.useState('');
  const [reversedValue, setReversedValue] = React.useState('');

  const onPress = () => {
    const revString = SampleTurboModule.reverseString(value);
    setReversedValue(revString);
  };

  return (
    <SafeAreaView style={styles.container}>
      <View>
        <Text style={styles.title}>
          Welcome to C++ Turbo Native Module Example
        </Text>
        <Text>Write down here the text you want to reverse</Text>
        <TextInput
          style={styles.textInput}
          placeholder="Write your text here"
          onChangeText={setValue}
          value={value}
        />
        <Button title="Reverse" onPress={onPress} />
        <Text>Reversed text: {reversedValue}</Text>
      </View>
    </SafeAreaView>
  );
}

const styles = StyleSheet.create({
  container: {
    flex: 1,
    justifyContent: 'center',
    alignItems: 'center',
  },
  title: {
    fontSize: 18,
    marginBottom: 20,
  },
  textInput: {
    borderColor: 'black',
    borderWidth: 1,
    borderRadius: 5,
    padding: 10,
    marginTop: 10,
  },
});

export default App;
此应用中interesting lines 是
import SampleTurboModule from './specs/NativeSampleModule';:此行在应用中导入 Turbo 原生模块,const revString = SampleTurboModule.reverseString(value);在onPress回调中:这是您可以在应用中使用 Turbo 原生模块的方式。
为了便于示例并保持其尽可能简短,我们直接在应用中导入了 spec 文件。在这种情况下,最佳实践是创建一个单独的文件来包装 spec,并在您的应用程序中使用该文件。这允许您准备 spec 的输入,并让您在 JS 中更好地控制它们。
恭喜,您已经编写了第一个 C++ Turbo 原生模块!
 |  |